How Many Lumens Do I Need For Outdoor Lighting?

Lumens are the honest measure of how much light a fixture actually puts out. Watts used to be the shorthand, back when everything was incandescent, and a 60-watt bulb meant something specific. LED changed that. Now two fixtures with the same wattage can produce wildly different amounts of light. So lumens are what matter.


The question is how many you need. The answer is: it depends on what the fixture is doing, where it's mounted, and what it's lighting. Here's the framework we use on every Northern Colorado install.


Short Answer: How many lumens you’ll need

Path lights 50 to 200. 


Step lights 12 to 100. 


Porch sconces 400 to 800. 


Floodlights 700 to 2,500+, depending on coverage. 


Uplights 100 to 400. 


Downlights 200 to 600. 


Hardscape 30 to 150 per foot. 


String lights 40 to 100 per bulb. 


Size to the job, pair high-output fixtures with motion sensors, and remember that mount height and aim matter as much as raw output.


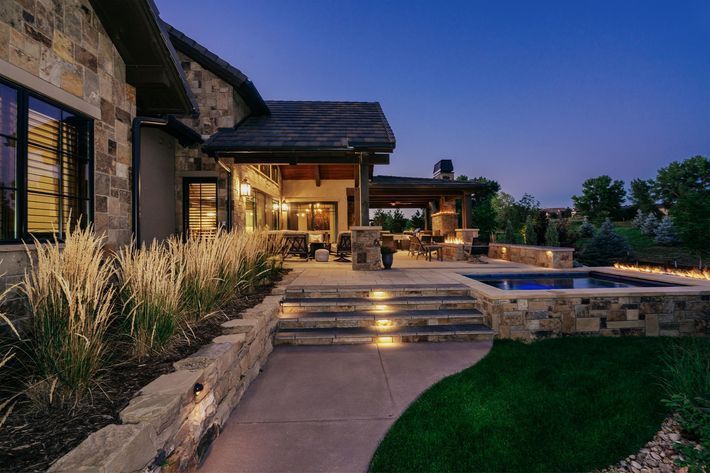
Path and walkway lights: 50 to 200 lumens

Path lights are not supposed to be bright. Their job is to show you the edge of the sidewalk, not to light the neighborhood. Anything above about 200 lumens at ankle height starts feeling harsh and makes the space less inviting.


For most residential paths, we use fixtures in the 50 to 100 lumen range, spaced 8 to 10 feet apart. Brighter isn't better. A gentle wash of light with dark space between fixtures reads more naturally than a line of glowing orbs.


Step and deck lights: 12 to 100 lumens

Recessed step lights live in a tiny range. You want enough light to see the edge of the tread and the drop to the next step, and nothing more. 12 to 40 lumens per step light is typical for indoor stairs, and 40 to 100 lumens for outdoor steps where ambient conditions can get darker.

Over-lighting a stair is a real problem. Glare on an icy step is worse than a slightly dim one, because your eyes adjust poorly to hot spots in a dark setting.


Entryway sconces and porch lights: 400 to 800 lumens

This is the fixture that greets people. It needs to be bright enough to see a face, read a package label, and make the entry feel welcoming, but not so bright that it's blinding or washes out the architecture.


Most of the porch and sconce fixtures we spec fall between 400 and 800 lumens. If you have two sconces flanking a door, aim for 400 to 600 lumens each and let them work together. A single larger fixture over a door usually lands closer to 800.


If the color temperature is wrong, even the right lumens will feel off. We cover the color side in detail in what colors are best for outdoor lighting and why.


Floodlights and security lights: 700 to 2,500+ lumens

Floodlights have the widest range because they cover the widest spread of jobs. A small floodlight covering a backyard patio needs far less output than a dusk-to-dawn security light covering a long driveway.


Rough ranges we use:

  • Small patio or yard coverage, 700 to 1,300 lumens.
  • Medium residential driveway or side yard, 1,300 to 2,000 lumens.
  • Large property, commercial-style coverage, or long driveways, 2,000 to 2,500+ lumens.


Always pair higher-lumen floodlights with motion sensors. Running a 2,000-lumen light all night is wasteful and harsh.


Spotlights and uplights: 100 to 400 lumens each

Uplights on trees and architectural features don't need to be punishing. 100 to 300 lumens is usually plenty for a tree up to about 20 feet. Larger specimen trees or tall stone chimneys can go up to 400.


The mistake people make is thinking uplights need to match interior accent lighting in brightness. They don't. Outdoor ambient light is much lower, and your eyes adjust. A 200-lumen uplight at night reads like a spotlight.


Downlights and moonlighting: 200 to 600 lumens

Mounting downlights up in a tree or under an eave to cast light downward is one of the most elegant outdoor lighting techniques. Lumens need to be moderate, between 200 and 600 for most applications. The effect depends on distance to the ground and the branches the light filters through.


Hardscape lights: 30 to 150 lumens per foot

Linear LED hardscape fixtures are usually measured in lumens per foot rather than total output. A typical range for retaining walls, cap stone lighting, and pergola strips is 30 to 150 lumens per foot, with most residential applications sitting around 60 to 100.


String lights: 40 to 100 lumens per bulb

Market-style string lights are atmosphere, not illumination. Bulbs in the 40 to 100 lumen range (equivalent to about 5 to 10 watts in LED terms) give you that warm patio feel without washing out other lighting.


A few principles that save trouble later

Warm color temperatures matter more than raw lumen count. A 400-lumen fixture at 2700K feels more inviting than an 800-lumen fixture at 5000K, even though the second is technically twice as bright.


Mount height changes everything. A 1,000-lumen floodlight 8 feet up covers a small area. The same fixture at 20 feet spreads the light across a much wider patch, so each square foot gets less. When you're sizing, think about coverage area, not just raw output.


Glare is the enemy. A fixture that puts out the right lumens but sends half of them directly into your eyes is worse than a dimmer fixture aimed correctly. Shielded fixtures, downward aim, and thoughtful placement beat brute-force brightness every time.


Layer, don't stack. Resist the urge to buy brighter fixtures when you can instead add a second, lower-lumen fixture for balance. Two 400-lumen sconces on a porch are almost always better than one 1,000-lumen fixture.


Tying it into the broader plan

Lumens are one piece of the outdoor lighting picture. Fixture type, color temperature, placement, and permitting all matter. Our guide to choosing outdoor lighting walks through the whole decision, and our rundown of types of outdoor lighting shows where each category belongs.


If you're wiring new circuits or installing fixed exterior fixtures in Colorado, a permit is often required. We break down what triggers one in our guide to permit requirements for exterior lighting in Colorado.


Final thoughts on how many lumens you need for outdoor lighting

We've been handling lighting jobs across Northern Colorado since 1998. You can see what we cover on our indoor and outdoor lighting installation page, and lighting rolls in with everything else we handle under home maintenance.


Get the lumens right, and your house reads the way it's supposed to after sunset. Get them wrong, and you'll notice every night.


By Alex Wells April 23, 2026
Good outdoor lighting does more than look nice. It keeps your family safe on icy walkways in January. It shows off the stonework you paid good money for. It adds usable hours to your patio when the sun drops behind Horsetooth. Get it right, and you barely think about it. Get it wrong, and you spend five years squinting at a porch light that's too harsh or a floodlight that lights up the neighbor's bedroom instead of your driveway. We've been installing lighting on Northern Colorado homes since 1998. Here's how we think through the decision with our clients, and how you can approach it yourself. Start with the job each fixture has to do Outdoor lighting isn't one category. It's at least four, and mixing them up is the most common mistake we see. Security lighting scares off what shouldn't be there and helps you see who's at the door. It's bright, it's motion-activated, and it points outward from the house. Path lighting keeps feet where they're supposed to be. Think low-level glow along walkways, steps, and any transition where a guest could misjudge a grade change. Accent lighting is the fun part. Uplighting on an aspen, grazing light on a stone fireplace chimney, moonlight effects under a deck pergola. This is where your house starts looking like something. Task lighting gives you useful light for grilling, reading on the porch, or finding your keys in the entryway planter. Before you pick a single fixture, walk the property at dusk and write down the jobs. Then pick fixtures for each one. Not the other way around. Match the fixture to the Colorado climate Fort Collins weather is hard on hardware. Hail one afternoon, UV cooking plastic the next, then a 40-degree temperature swing by bedtime. Cheap fixtures don't survive it. We look for cast brass, copper, or powder-coated aluminum for anything exposed. Plastic lenses crack under hail; glass holds up longer. Gasketed seals matter more here than they do in a milder climate. If the listing says "weather resistant" without a clear rating, skip it. Look for IP65 or better for fixtures that catch rain, and IP67 for anything near grade that might sit in snowmelt. For a deeper rundown of fixture categories and where each one belongs, see our guide to types of outdoor lighting . Get the brightness right, not just bright More lumens is not automatically better. A 3,000-lumen floodlight pointed at a front door is aggressive, not welcoming. A 50-lumen path light on a 40-foot driveway is invisible. The right answer depends on mounting height, the surface you're lighting, and what the fixture is meant to do. Path lights typically land between 50 and 200 lumens. Porch lights sit around 400 to 800. Floodlights range widely, 700 to 2,000+ depending on coverage area. We wrote a full breakdown of this in our piece on how many lumens you need for outdoor lighting . If you're spec'ing fixtures yourself, read it before you buy anything. Pay attention to color temperature This is where a lot of otherwise good outdoor lighting plans fall apart. Color temperature is measured in Kelvin, and a few hundred degrees changes the whole feel of your home after dark. Warm white around 2700K to 3000K looks like incandescent light. It flatters stone, wood, and landscaping. Neutral white around 3500K to 4000K is crisper and better for task areas. Anything above 5000K starts to feel like a gas station. For most residential exteriors in Northern Colorado, we stay in the 2700K to 3000K range and let the fixtures layer warmth into the evening. If you want the full explanation of why, we covered it here: what colors are best for outdoor lighting and why . Think in layers, not in dots A common trap is treating outdoor lighting as a list of fixtures to buy, instead of a composition. The houses that look best at night have multiple layers working together. A dim wash on the architecture, stronger accents on specimen trees, path lights at ankle height, and a porch light that's just bright enough to see a face. When you walk a well-lit property, you usually can't see where the light is coming from. You just see the house. Aim for that. Don't skip the permit question In Colorado, some exterior lighting work needs a permit. Low-voltage landscape lighting usually doesn't. Anything tied into line-voltage circuits, new dedicated runs, or outdoor service panels often does. This is worth getting right the first time. Unpermitted electrical work can bite you during a home sale, an insurance claim, or a future inspection. We walk through the details in do you need a permit for exterior lighting installation in Colorado . When to bring in a pro If you're swapping a porch light fixture, you probably don't need us. If you're running new circuits, mounting fixtures on a two-story façade, or designing a layered scheme across a half-acre lot, it's worth having a licensed crew handle it. We stay current on Fort Collins code, pull the permits, and make sure the whole setup is built to survive Northern Colorado weather. You can see the full scope of what we handle on our indoor and outdoor lighting installation page, and lighting fits alongside everything else we cover under home maintenance . Final Thoughts on Choosing Outdoor Lighting Write down the jobs each fixture has to do. Buy for the climate. Get the lumens right. Keep the color temperature warm. Layer the light. Don't skip the permit. And if it's a bigger project, don't compromise; your home is worth the care of a crew that does this for a living.  Ready to talk through a plan for your property? Give us a call, and we'll walk it with you.
home with warm  lighting
By Alex Wells April 23, 2026
Walk through any well-designed Northern Colorado property after sunset, and you'll notice something. The outdoor lighting doesn't feel like lighting. It feels like the house just looks that way. That's because the people who planned it used the right type of fixture for each job, then got out of the way.  There's no single "outdoor light." There's a toolkit, and each tool has a purpose. Here's how we break it down when we're planning a job in Fort Collins, Loveland, or anywhere in our service area. Path and walkway lights These are the shorter fixtures you see spaced along sidewalks, garden edges, and driveway borders. Most sit between 18 and 24 inches tall, throw a soft pool of light downward, and run on low voltage. Good path lights keep feet where they should be without blinding anyone. Common mistake: spacing them like airport runway lights, four feet apart. Real path lighting is closer to 8 to 10 feet, with enough throw between fixtures to read as continuous rather than a string of dots. Step and deck lights Recessed step lights are small, usually LED, and mounted into the riser of a staircase or the side of a deck post. They're the quiet workhorse of outdoor lighting. No glare, no wasted light, just enough to see the edge of the next step. On a Colorado deck that gets real winter use, step lights are worth the install every time. Ice plus darkness plus a misjudged stair is a recipe for a bad night. Wall-mounted sconces and lanterns These sit on either side of garage doors, entry doors, and sometimes along long exterior walls. They're both architectural and functional. A pair of properly sized lanterns on an entry changes the whole face of a home. A common problem is scale. Most builder-grade lanterns are too small for the door they flank. We tell clients to measure the door height and aim for fixtures roughly a quarter of that height, sometimes more on a two-story entry. If you're not sure how to think through it, our guide to choosing outdoor lighting walks through fixture selection in detail. Floodlights and security lights Floodlights throw a wide, bright beam and are usually mounted high. Security-specific versions add motion sensors and sometimes cameras. They're not subtle, and they're not supposed to be. The trick with floodlights is aim and glare. A floodlight pointed slightly down and away from the property line lights your yard. The same fixture pointed level lights your neighbor's bedroom. We see this one on almost every walkthrough. Point the light where you want it, not where the manufacturer mounted the bracket. Security lighting should also be paired with a motion sensor so it's only running when something triggers it. Permanent floodlighting is rarely the answer, and it isn't kind to anyone trying to sleep. Spotlights and uplights Spotlights cast a narrow, focused beam. Uplights are spotlights aimed at the ground pointing up, typically used on trees, columns, stone features, and architectural details. This is where outdoor lighting starts to feel intentional. A well-placed uplight on a mature aspen in the front yard does more for curb appeal than almost any other single fixture. Two of them, cross-aimed, do even more. Just don't overdo it. Three uplights per tree is usually plenty. Downlights and moonlighting Downlights mount high in trees or under eaves and cast light downward, often through branches. The effect is called "moonlighting," and when it's done right it looks like the moon is sitting just above your yard. This is one of our favorite techniques on larger properties. It lights a big area without any fixture being visible at eye level. Expensive to install. Worth it. Hardscape lights These are small, linear LED fixtures built into or mounted on retaining walls, stair treads, pergolas, and capstones. They're nearly invisible during the day and add a warm line of light at night. Hardscape lighting does a lot of heavy lifting for backyard entertaining. If you spent money on a stone patio or a built-in fire pit, it should have hardscape lighting integrated into it. String lights and market lights The café-style bulbs strung across a patio or pergola. They're not serious architectural lighting, but they make a space feel warm and used. Fine for a patio. Not a substitute for real path or task lighting. In Colorado, look for bulbs rated for outdoor use and shatter-resistant housings. Hail doesn't negotiate with glass string lights. In-ground and well lights These sit flush with the ground, aimed up. They're used for uplighting walls, facades, and large trees when you don't want a visible fixture. The installation is more involved because they have to be sealed against water, and in our climate, they need to handle snowmelt and freeze cycles too. A few rules that cut across all of them Pick warm color temperatures, 2700K to 3000K, for residential exteriors. We explain the reasoning in what colors are best for outdoor lighting and why . Size the brightness to the job. Not every fixture needs to be bright. Our lumens guide breaks down the numbers by fixture type. Before you buy line-voltage fixtures or plan a larger system, check the permit rules. In Colorado, exterior electrical work often triggers one. Our rundown on permit requirements for exterior lighting in Colorado covers what to expect. When to call a crew Some of this you can do yourself. Swapping a sconce, adding a string of solar path lights. Fine. But when you're running new circuits, trenching cable, or trying to design a layered composition across a whole property, the job gets harder fast. We've been installing lighting on Northern Colorado homes since 1998. You can see the full picture of what we handle on our indoor and outdoor lighting installation page, and lighting is one piece of everything we cover across home renovations and home maintenance . Pick the right type for the job, set it up to survive the climate, and you'll have a property that works after dark for a long time.
A  home with warm lighting
By Alex Wells April 23, 2026
Two houses on the same block, same style, same fixtures. One feels inviting at night. One feels like a parking lot. The difference is usually color temperature. Color temperature is how warm or cool a light source looks, measured in Kelvin. Lower Kelvin values read as yellow or orange. Higher values read as white or blue. On the packaging it'll be labeled something like 2700K, 3000K, 4000K, or 5000K. A few hundred degrees shifts the whole feel of your home after dark. Here's how to think through it, and what we use on Northern Colorado jobs. The short answer For residential exterior lighting , we stay in the 2700K to 3000K range almost every time. Warm white. That's the sweet spot for flattering stone, wood, brick, landscaping, and skin tone, which matters when you're entertaining on a patio or greeting someone at the door. If you're not sure where to start, start there. 2700K on most fixtures, 3000K if you want something slightly crisper. We'll get into the exceptions in a minute. Why warm white works outside Outdoor environments already trend cool. Moonlight is cool. Snow is cool. Shadows read blue. When you drop a warm-temperature fixture into that setting, it creates a contrast your eye reads as welcoming. The stone of a chimney looks richer. Wood siding looks alive. Foliage looks green instead of gray. Cooler light, 4000K and above, flattens that contrast. It makes the house feel utilitarian. Useful for a loading dock. Less useful for the front of a home that your family walks up to at night. There's also a psychological layer. Warm light signals rest and home. Cool light signals alertness and work. Your front yard is not supposed to feel like an operating room. When to use 3000K instead of 2700K 3000K is still warm, but a touch crisper. We'll reach for it when: The exterior uses a lot of cool-toned materials, gray stone, white trim, modern steel accents. 2700K can look too yellow against a cool palette. 3000K sharpens it up. The architecture is modern or contemporary. Very warm tones on a sleek modern façade can read dated. 3000K threads the needle. You want slightly more color accuracy for task areas, like a grill station, outdoor kitchen, or detailed landscaping you want to see clearly. Where 4000K has a place 4000K, sometimes called "cool white" or "neutral white," has a narrow role outside. Security lighting. If the whole point of a fixture is to deter and illuminate a threat, you want clarity, not warmth. 4000K reads as alert, and security cameras often capture better footage under it. Functional service areas. A detached garage, a workshop, a utility side of the house. Places where you're doing tasks rather than hosting. Commercial or quasi-commercial exteriors. A short-term rental property with parking might warrant cooler lighting for visibility. Even then, we'll usually keep 4000K out of sightlines from the main living areas. A cool-temperature floodlight on the back of a garage is fine. The same fixture pointed at the patio will ruin the patio. Why 5000K and above almost never belongs on a home 5000K and higher is marketed as "daylight" and for years was the default on builder-grade LED fixtures because it produces the highest lumen output per watt, so it tests well on the spec sheet. It also makes your house look like a gas station. 5000K in a residential exterior context is harsh, clinical, and bluish. It doesn't flatter anything except maybe a solar panel array. We occasionally see it on older security floods, and we almost always swap those out when we're doing a lighting update. Color rendering index (CRI) matters almost as much Kelvin isn't the full story. Color rendering index, CRI, is a measure of how accurately a light source shows the colors of the objects it lights. A score of 100 matches natural daylight. A score of 70 is what you'd expect from cheap LED. For residential outdoor lighting we look for CRI of 90+. Lower than that and reds start looking muddy, greens look washed out, and the whole yard reads like a photograph that's been processed poorly. Spec sheets don't always list CRI, but it's worth asking. The difference between a 70 CRI and a 90 CRI fixture at the same color temperature is significant. Consistency across fixtures One of the subtle things that makes a well-lit property look designed is that every fixture reads the same temperature. If your path lights are 3000K, your sconces are 2700K, and your floodlight is 5000K, the whole system feels off even if each fixture is fine on its own. When we're spec'ing a job, we match color temperature across all exterior fixtures within visible range of each other. It's a small discipline that makes a big difference. A note on smart bulbs and adjustable fixtures Some exterior fixtures now offer adjustable color temperature, usually across a 2200K to 5000K range. They're useful for flexibility, and convenient if you want the option to run warmer during dinner and cooler during a security event. Quality on these varies. The cheap ones shift colors oddly across the range and tend to fail faster in Colorado weather. If you're going this route, stick with reputable brands rated for exterior use. How color ties into the rest of the plan Color temperature is one layer of a good lighting plan. Lumen output, fixture type, aim, and placement all matter too. Our outdoor lighting selection guide walks through the whole decision, and our rundown of types of outdoor lighting shows how each fixture category fits. If you're still dialing in how bright each fixture should be, we covered that in how many lumens you need for outdoor lighting . And if you're doing more than a swap of a single fixture, check whether your project needs a permit. We explain what triggers one in permit requirements for exterior lighting installation in Colorado . Final thoughts on choosing the right outdoor lighting color 2700K to 3000K for almost every residential exterior. 4000K reserved for security and service areas. 5000K and up, basically never. CRI of 90+ whenever you can get it. Consistent color across all fixtures within sight of each other.  We've been handling this kind of work across Northern Colorado since 1998. The full scope of our lighting services lives on our indoor and outdoor lighting installation page, and lighting fits in with everything else we cover across home maintenance and home renovations . Pick the right color and your house reads the way you want it to, every night.
By Alex Wells March 17, 2026
The body content of your post goes here. To edit this text, click on it and delete this default text and start typing your own or paste your own from a different source.
By Alex Wells March 17, 2026
When you start planning a bathroom remodel , it’s easy to focus on the fun parts. New tile, updated fixtures, better lighting, maybe even a full layout change. But before any of that begins, you'll need to know whether or not you need a permit. The short answer is yes, in many cases. But like most things in construction , the real answer depends on what you’re changing, where you live, and how the work is being done. As a team that has handled remodeling projects across Northern Colorado for decades, we can tell you this with confidence: understanding permits upfront saves time, money, and headaches later. Let’s walk through exactly what you need to know. The Simple Answer: It Depends on the Scope In Colorado, bathroom remodel permits are not one-size-fits-all. Whether or not you need a permit comes down to what kind of work you’re doing . You’ll likely need a permit if your remodel includes: Moving or adding plumbing (toilets, sinks, showers, tubs) Installing new electrical wiring, outlets, or lighting Changing ventilation systems (like adding an exhaust fan) Modifying walls, framing, or structure Reconfiguring the layout of the bathroom Across most cities and counties, including Larimer County and Fort Collins, any work that affects plumbing, electrical, mechanical, or structural systems requires a permit and inspection. You probably won’t need a permit for: Painting walls or ceilings Replacing tile or flooring (without structural changes) Swapping fixtures in the exact same location Installing new cabinets or vanities without altering plumbing These are considered cosmetic updates , and they typically don’t require approval. Why Permits Matter More Than You Think A lot of homeowners see permits as a formality or even a hassle. We get it. Nobody wants extra paperwork slowing down their project. But permits exist for a reason, and skipping them can create serious problems. 1. Safety Comes First Bathrooms are one of the most complex rooms in your home. You’re dealing with water, electricity, ventilation, and structural components all in a tight space. Permits ensure: Electrical work is protected from moisture (GFCI outlets, proper grounding) Plumbing is installed correctly to prevent leaks and water damage Ventilation systems prevent mold and moisture buildup Structural changes won’t compromise your home’s integrity Every permitted project includes inspections to verify the work meets code. 2. It Protects Your Investment Your home is one of your biggest investments. Unpermitted work can reduce its value or create complications when you try to sell. Buyers and inspectors will look for: Code-compliant work Documented permits Passed inspections If something wasn’t permitted, it can: Delay or derail a sale Lower your appraisal Require costly corrections before closing 3. Avoid Fines, Delays, and Red Tape Starting a remodel without a required permit can lead to: Stop-work orders Daily fines (sometimes hundreds of dollars) Double permit fees to correct the issue later Being required to tear out finished work for inspection We’ve seen it happen, and it’s never worth the risk. What Permits Are Typically Required? For a full bathroom remodel, you’re often not dealing with just one permit. Depending on the scope, your project may require multiple approvals. Common permit types include: Building Permit Covers structural changes, framing, layout adjustments, and general construction. Plumbing Permit Required for: Moving fixtures Rerouting water or drain lines Installing new plumbing systems Colorado state regulations require a plumbing permit before installing or modifying plumbing systems . Electrical Permit Needed for: New lighting or outlets Heated flooring Updated circuits or wiring Mechanical Permit Applies to ventilation systems like exhaust fans and ductwork. Each of these ensures your bathroom isn’t just beautiful, but built to last. What About Fort Collins and Northern Colorado? Here in Fort Collins and the surrounding areas, building departments follow adopted building codes for all remodels , repairs, and new construction . That means: Permits are required when work impacts regulated systems Plans may need to be submitted for review Inspections are required before closing up walls or completing the project If you’re in Larimer County or nearby communities like Loveland, Windsor, or Berthoud, the rules are similar. Local jurisdictions enforce permits to ensure safety, code compliance, and long-term durability. Can You Pull a Permit Yourself? Yes, in many cases, homeowners in Colorado can pull their own permits if: The home is their primary residence They are doing the work themselves The project complies with all codes However, there’s a catch. When you pull your own permit, you take full responsibility for: Code compliance Scheduling inspections Correcting any issues that fail inspection For most homeowners, this is where things can get complicated. Why Working With a Contractor Makes the Process Easier At J. Allen Construction Company, we handle permits as part of the process. That’s not just about convenience. It’s about doing the job right from start to finish. When you work with an experienced contractor: We know exactly which permits are required We submit plans and documentation correctly We coordinate inspections at the right stages We ensure everything passes the first time That’s how we keep projects moving forward without unnecessary delays. Final Thoughts: Bathroom Remodel Permits in Colorado A bathroom remodel is one of the best ways to improve your home’s comfort, functionality, and value. But like any investment, the details matter. Permits might not be the most exciting part of the process, but they’re one of the most important. At J. Allen Construction Company, we believe in doing things the right way. That means: No shortcuts No overlooked details No surprises at the end From the first plan to the final inspection, we make sure your remodel is built to meet your expectations and stand the test of time. If you’re planning a bathroom remodel in Northern Colorado and want a team that handles every detail, we’re here to help.
By Marilyn Allen February 4, 2026
This winter, a lot of us have been looking at the foothills and Front Range skies thinking the same thing: where’s the snow? Colorado is in a statewide “ snow drought ,” driven by an unusually warm and dry start to winter. From a homebuilding perspective, that matters more than most people realize. Snowpack is not just a ski-season issue. It is a slow-release water bank that helps fill rivers and reservoirs through spring and early summer. When that bank is underfunded, the ripple effects show up in wildfire risk, water planning, landscaping decisions, and even how we think about building and renovating homes in fire-prone areas. We want to walk through what a snow drought can mean for homeowners in Colorado, and the practical steps that make the biggest difference if 2026 trends toward a hotter, drier, more fire-active season. What “Snow Drought” Means in Plain English Snow drought does not always mean there has been zero precipitation. It often means precipitation is falling as rain instead of snow, snow is melting earlier, or the total snow water equivalent (SWE) is far below what is typical for the date. That’s exactly the concern being raised across the West this year. The federal drought portal reported that a large share of SNOTEL stations in Colorado are experiencing snow drought conditions, tied to warmth that limits mountain snow accumulation. And the USDA NRCS reported record-low snowpack observations across much of the state heading into 2026. Per the Colorado Public Radio , major river basins were running well below normal for this time of year, and experts warn that poor snowpack years often precede Colorado’s worst fire seasons. Why Snow Droughts Make for a Rough Fire Season Wildfire behavior is influenced by many variables, but the basic chain is easy to understand: Less snow and earlier melt means landscapes dry out sooner. Dry fuels and warm weather can extend the window for significant fires. Wind-driven ember exposure is often what actually ignites homes, not a wall of flame. That “earlier drying” pattern is part of why drought and low snowpack get so much attention in fire outlook conversations. For homeowners, the key takeaway is this: if the broader environment is primed for fire, the details of your property and your home’s exterior become much more important. What We Recommend If you do only a few things, prioritize the actions below. They’re supported by wildfire science and are realistic for most homeowners. 1) Treat the first five feet like a “no-burn zone” The immediate area around your home is one of the highest leverage places to reduce ember ignitions. The NFPA emphasizes preparing homes for ember exposure and reducing the likelihood of flames contacting the structure. Practical moves: Replace wood mulch right next to the house with rock or noncombustible groundcover. Remove leaf litter and dead vegetation. Avoid storing combustible items against siding. 2) Make ember entry harder The IBHS Wildfire Prepared Home guidance highlights vents, roofs, and gutters as common vulnerabilities, with recommendations like ember-resistant vents or fine metal mesh, among other minor renovations . This is a big deal because embers can find tiny pathways into attics and crawlspaces, then ignite materials out of sight. 3) Reduce fuels in layers, not just one clearing Defensible space is not only about hacking everything down. It is about spacing, maintenance, and reducing continuous fuels as you move away from the structure. 4) If you are renovating, “fire-hardening” upgrades can be built into the scope If you already have a remodel planned, that is the perfect time to consider upgrades that are hard to justify as standalone projects later, like: More ignition-resistant exterior materials where appropriate Better venting protection Window and door sealing improvements Deck detailin g that reduces debris traps Our Bottom Line for 2026 We can’t control snowpack, wind, or how hot July gets. But we can control how prepared a home is for ember exposure, how fuels are managed around the structure, and whether renovation dollars are spent in ways that reduce risk over the long term. Snow drought years are a reminder to treat resilience as part of responsible homeownership, not as a panic purchase when smoke is already in the air. If you want a second set of eyes on a renovation plan or you’re thinking about building with wildfire resilience in mind, get in touch with us.
By Marilyn Allen January 12, 2026
On September 22, 2025 , the Larimer County Board of County Commissioners adopted an updated set of building codes and local amendments that will apply to permits initiated on or after January 1, 2026 . These updates replace the County’s 2021 code editions effective that same date. At J Allen Construction Company , we’ve reviewed the adoption resolution and the County’s published guidance so homeowners, designers, and builders can understand what is changing and how it may affect planning, permitting, and project scope as 2026 approaches. Note, this blog is for informational purposes only; your project is unique and you may need to speak with the Colorado Energy Office for specifics about your case. What Has Changed: The 2024 I-Codes Become the Baseline (Starting January 1, 2026) Larimer County is adopting the 2024 editions of the core International Code Council “I-Codes” (with local amendments), effective January 1, 2026 , and repealing the previously adopted 2021 editions effective the same day. The adopted 2024 code set includes: 2024 International Building Code (IBC) 2024 International Residential Code (IRC) 2024 International Energy Conservation Code (IECC) 2024 International Existing Building Code (IEBC) 2024 International Mechanical Code (IMC) 2024 International Plumbing Code (IPC) 2024 International Fuel Gas Code (IFGC) 2024 International Property Maintenance Code (IPMC) 2024 International Swimming Pool and Spa Code (ISPSC) The County is also continuing to reference the 2023 National Electrical Code (NEC) in its published list of codes for 2026 permits. Why This Matters for Northern Colorado Homeowners and Builders 1) A newer code cycle is being adopted, but the resolution does not list every technical change Larimer County’s resolution explains the “I-Codes” are updated on a three-year cycle and are intended to reflect the most current building science and consensus process. What it does not do is itemize every requirement that changed between 2021 and 2024. So the safest way to think about this is: the baseline rulebook is updating , and depending on your project, you may see differences in plan review expectations, documentation, and prescriptive requirements compared to the 2021 editions. 2) Colorado’s Electric Ready and Solar Ready Code is included (and it is a state-required adoption) Larimer County’s adoption package includes the Colorado Electric Ready and Solar Ready Code , and the resolution notes this is a state-produced code that local governments must adopt when adopting other building codes. What homeowners should take from that is simple: many new builds (and some major projects) may need to be designed with “future readiness” in mind , even if you are not installing solar or fully electrifying on day one. Exactly what that means for your plans depends on the building type and the specific provisions Larimer is enforcing through its adopted amendments and permitting workflows . 3) Larimer County is adopting the 2025 Colorado Wildfire Resiliency Code (not a 2024 edition) This is a key detail. Larimer County’s public Building Codes page identifies this as the “ 2025 Wildfire Resiliency Code ” with Larimer County amendments, effective January 1, 2026 , and adopted on September 22, 2025 . So while the I-Code suite is the 2024 editions, the wildfire standard being adopted alongside them is explicitly the 2025 Wildfire Resiliency Code document. Wildfire Resiliency: What Homeowners Should Understand (And Where People Get This Wrong) A common misconception is that wildfire code requirements “only apply to brand-new homes.” The Larimer-adopted Wildfire Resiliency Code includes provisions that can apply to existing buildings when specific thresholds are met . For example, it states: Roof coverings: if a roof covering is replaced or if 25% or more of the roof surface area is replaced, the code can require the entire roof covering to be replaced to the new-construction standard (with noted exceptions). Exterior walls: if 25% or more of the total exterior wall surface area is replaced (or if the work effectively replaces the exterior wall material), the code can require the entire exterior wall surface area and certain near-structure zone conditions to comply (with noted exceptions). It also includes language clarifying that provisions that specifically apply to existing conditions can be retroactive. How This Affects Remodels and Additions If you’re planning a remodel or addition , the key trigger is the County’s timing language: the adopted 2024 codes apply to permits initiated on or after January 1, 2026 . In practice, that means: Energy requirements for new or altered conditioned space will be reviewed under the 2024 IECC framework for 2026 permits. Life safety and building requirements for the new work will be reviewed under the applicable 2024 code(s), depending on whether the project is residential or commercial and how it is classified. The 2024 International Existing Building Code (IEBC) continues to be part of Larimer County’s adopted code framework and provides updated pathways for repairs, alterations, changes of occupancy, and additions in existing buildings. If the property is in a designated WUI area , wildfire-resiliency provisions may become relevant for certain additions and exterior alterations, including the “25% roof” and “25% exterior wall” triggers described above. Final Thoughts  Larimer County’s updated code adoption is a meaningful shift because it updates the baseline standards used for plan review starting January 1, 2026 , and it folds in Colorado’s Electric/Solar Ready requirements and the 2025 Wildfire Resiliency Code (with county amendments). For project-specific guidance, consult the Larimer County Building Division resources and your design professionals so you can align your plans with the standards that will govern your permit review in 2026. Of course, you can always hire us, and we’ll just handle all this for you! Get in touch with us for your next Northern Colorado addition, renovation, or home maintenance project.
By Alex Wells December 3, 2025
When a Permit Is Definitely Required for Your Addition  When you’re adding onto your home in Fort Collins, the city treats that work much like new construction. On the City’s Fast Track Permits page, “ Additions ” are listed under New Construction alongside new houses, sheds, and garages , which means they’re clearly in the permit-required camp. The residential submittal guide also spells out permit requirements for “New Single Detached Family Homes, Duplexes, Townhomes, and Additions,” with a dedicated checklist for those projects. In practical terms, you should expect to need a building permit if you’re planning to: Expand your home’s footprint with a bump-out or new wing Add a second story or pop-top Build an attached garage or finished space over a garage Do structural work (foundation, load-bearing walls, roof framing) tied to the addition Extra Layers: Zoning, Development Review, and Floodplains On some properties, the permit is only part of the story. Zoning & Development Review For certain projects, Fort Collins notes that a development review process may be required before you even submit for a building permit , especially when you’re changing how the site is used or adding more intense development. That’s where setbacks, lot coverage, height, and allowed uses get checked against the zoning rules, so you don’t design an addition the City can’t approve. Floodplains If your home sits in a mapped floodplain, the City requires a Floodplain Use Permit for any work done in the floodplain , including additions. Fort Collins also requires new residential structures and additions in the 100-year floodplain to be elevated above the mapped flood level , with specific freeboard requirements. What Happens If You Skip the Permit? Starting an addition without a permit isn’t just “bending the rules” a little. In Larimer County, if you begin construction without a required building permit, the building department can issue a Stop Work Order , require you to halt all work, and charge double the normal permit fee to legalize what’s already been done. Larimer County They also warn that unpermitted work might not meet setback rules, which can force you to move or even remove the structure, and you may be asked to open finished walls or ceilings so inspectors can see what’s inside. Bringing It All Together: Start With Good Information When you zoom out, the pattern is pretty simple: if your home is inside Fort Collins city limits, the City’s Building and Zoning Division is going to look at your addition the same way it looks at any new building or alteration, with plan review and inspections to make sure the work meets local code. If you’re just outside town, Larimer County’s building division fills that role for unincorporated areas. In both places, permits and scheduled inspections are what turn a set of drawings into a safe, legal space you can actually use.
By Alex Wells November 10, 2025
If you need more room, you’re not alone. Inventory has inched up across Northern Colorado, but it still isn’t generous enough to make moving simple or cheap. In Fort Collins, the median sale price was about $554,176 in September, and homes took roughly 42 days to sell. That’s an improvement in activity, yet not a wide-open buyer’s market. At the same time, more sellers are delisting rather than cutting prices, which makes “the right house” disappear in the middle of a search. As a local design-build remodeler, we see a better path for many families: create the space you need where you already live. Here’s why an addition , basement finish, or ADU often wins on cost, timing, and comfort.  The market math favors staying put Trading up means paying today’s market price and eating transaction costs, inspection repairs, and moving expenses. If you bought during the low-rate years, you’ll likely give up a favorable mortgage, too. Meanwhile, Fort Collins pricing still sits high enough that the “bigger house, same neighborhood” option pushes many budgets. When we price typical projects, a targeted addition or basement finish can deliver the rooms you want for less all-in than a move, especially if you can leverage existing equity to finance the work. You also avoid bidding wars and the risk that your dream listing gets pulled before you can act. Code changes are coming. Planning now is smart. Larimer County has adopted the 2024 building codes with an effective date of January 1, 2026 . Fort Collins is also moving to adopt the 2024 code set, including the International Existing Building Code (IEBC) for remodels and additions. Designing now lets us align your project with the performance and safety expectations that are on the way, so you aren’t forced into late changes during permit review. Where to invest square footage Primary suite addition. A rear bump-out or over-garage suite adds everyday livability and strong resale appeal without changing school zones or commute routes. Basement finishing. In many Fort Collins and Loveland homes, the fastest path to usable space is downstairs. Family room, guest suite, or a quiet office, all tied into upgraded insulation and mechanicals while walls are open. ADU or detached studio. This is a flexible option for multigenerational living or future rental income. Site planning, utilities, and zoning details matter, but when we handle design and permitting together, the process stays straightforward. Performance upgrades while you remodel. Windows, air sealing, insulation, and heat-pump-ready layouts are easiest to build in during an addition or basement project. With new codes taking effect in 2026, planning these elements now is simply good timing. Timeline advantages you can feel New construction has improved, but builders are still balancing incentives, locations on the edge of town, and delivery windows that may not match your family’s calendar. A well-scoped remodel can be scheduled around your real life and the local inspection rhythm, especially if we start design and permitting before the spring rush. Our process is built to keep your project moving: One accountable team. We handle concept, budgeting, selections, engineering, permits, and construction. Code-ready plans. We coordinate with the 2024 code trajectory so approvals go smoothly and your home performs the way it should. Clean, predictable job sites. Clear schedules, tidy work areas, and steady communication reduce disruption at home. The Bottom Line In today’s Northern Colorado market, moving often means paying more for compromises and chasing listings that may vanish. Adding space with a thoughtful remodel gives you control over cost, comfort, and timing. With 2024 codes approaching, it’s the perfect moment to design a project that fits your family now and meets tomorrow’s standards. Ready to explore your options? Schedule a design consultation with J Allen Homes. We’ll map budgets and timelines for your addition, basement finish, or ADU, and show you how to make the most of your current home.
By Alex Wells October 30, 2025
Thinking about a remodel or a new build in Colorado? The state now has a Model Low Energy and Carbon Code (MLECC) that raises the bar for comfort, indoor air quality, and long-term operating costs. It is not about making projects harder. It’s about making homes perform better, last longer, and cost less to run. The idea is simple. When your city or county next updates its building codes after July 1, 2026, it will need to adopt the MLECC or go stricter. That means future permits will check a few more energy and ventilation boxes than you may be used to. Quick Answer: Colorado’s New Model Low Energy and Carbon Code: What You Need to Know After local code updates on or after July 1, 2026, projects follow Colorado’s Model Low Energy and Carbon Code . Expect better comfort, healthier indoor air, and stronger efficiency with flexible compliance options and demand-response capable equipment. Why Colorado Built This Code In 2022, state lawmakers passed HB22-1362 , which created an Energy Code Board to draft modern standards. The law directed the Board to publish the model code and set the adoption framework so local governments can use it the next time they refresh their building codes. The law set minimum energy code requirements while preserving local adoption. That creates more consistency across Colorado while keeping room for local choices. What does that mean for you? When your city or county updates its building code after July 1, 2026, it must adopt the MLECC or adopt something that performs even better. You’ll see clearer expectations for insulation, air sealing, equipment efficiency, wiring readiness, and ventilation on plan sets and inspections. What Changes for New Homes Expect a practical checklist that nudges projects toward better envelopes and smarter equipment. Highlights you may encounter: Envelope quality: Tighter air sealing and right-sized insulation keep temperatures steadier and cut drafts. Heating and cooling options: Both all-electric and mixed-fuel designs can comply. The code offers clear compliance paths and credits that make high-efficiency electric heat and water heating straightforward to document Demand response capable systems: New construction must include heating, cooling, water heating, and lighting controls that are demand response capable where required. These systems can respond to a utility signal during peak demand and may qualify for utility programs. Projects must meet the statewide model’s performance or prescriptive options set by the adopting jurisdiction. Check with your building department for any local amendments that apply to larger homes. For many families, high-efficiency heat pumps are attractive because one system delivers heating and cooling and performs well in cold climates. That can mean steadier comfort and lower utility bills over time. This direction aligns with Colorado’s building decarbonization goals . What Changes for Renovations, Additions, and ADUs Not every small refresh triggers major upgrades, but additions and significant remodels will interact with the MLECC once your jurisdiction adopts it. Counties and cities will use the model when updating their codes , which apply to both new construction and certain renovation scopes. The exact thresholds for what is considered an “ addition ,” “alteration,” or “substantial improvement” are set in local code text, so it is important to clarify with your building department. Two quick examples to make this real: Kitchen gut with new exterior openings: Likely triggers envelope details around new walls or windows, plus updated ventilation and right-sized equipment checks. Small bathroom refresh with fixtures only: Often, minimal energy code impacts, though local rules may still require ventilation or lighting updates. If you are planning an ADU, budget time for envelope, ventilation, and electrical capacity planning. ADUs are small, which makes good air sealing and balanced ventilation especially important for comfort and indoor air quality. Homeowners should also verify panel capacity and plan for “electric-ready” needs. The Upside for Homeowners A better code should feel better to live with. Expect steadier temperatures, quieter equipment, cleaner indoor air, and lower utility costs over time. Comfort you can feel: Tighter shells and right-sized systems mean fewer hot and cold spots. Quieter operation: Modern high-efficiency systems often run more quietly. Healthier indoor air: Balanced ventilation and filtration reduce pollutants and help manage humidity. Lower utility costs over time: Efficiency gains cut energy use and utility costs , and demand-response capability can qualify for utility programs. Resilience: Homes that hold temperature better ride out outages and heat waves more gracefully. Future-ready value: Electric-ready wiring and efficient equipment position your home for future technology and market expectations. Timeline and Who Must Adopt Here is the timing that matters for planning: Now through June 30, 2026: If a city or county updates its current code in this window, it must adopt an energy code that is at least equivalent to the 2021 IECC and include electric-ready and solar-ready provisions developed by the Energy Code Board. Starting July 1, 2026: When a city or county next updates any of its building codes, it must adopt the Model Low Energy and Carbon Code or an equivalent that achieves equal or better energy and carbon performance. The MLECC becomes the new floor at the time of each local update. Your permit will follow whatever code is in force locally when you apply. This staggered approach keeps projects moving while aiming for a consistent statewide performance level. Local adoption dates will not all be the same, so always check what is current in your jurisdiction. Cost, Equipment, and Practical Planning Upfront costs can shift depending on your starting point and project type. Many buyers offset new equipment or envelope measures with lower monthly utility bills and potential incentives. The code keeps compliance pathways flexible so builders can choose the mix that fits the design. Before you design too far, line up the basics: Energy goals: Decide whether you want all-electric or mixed fuel. Both can comply. Panel capacity: Ask your electrician to assess headroom for heat pumps, heat pump water heaters, induction, and EV charging. Ventilation plan: Specify balanced ventilation with filtration. This is a comfort and health play as much as an energy one. Envelope check: Air sealing, insulation, and high-performance windows pay you back daily. Utility coordination: Explore demand response programs and rebates that match code-ready equipment. Final Thoughts The Model Low Energy and Carbon Code is about smarter homes and lower bills, not hoops for the sake of hoops. With a clear plan, you will get a house that feels better year-round, breathes better, and costs less to operate. When you are ready, let us talk about how a code-smart plan can shape your project so construction is smooth and the results are worth it.